Custom Report for Business Central
- Steve Simon
- Dec 29, 2018
- 4 min read
This example is based on the Dynamics Learning Portal Course 81224. It is daunting for non-developers to learn the AL Language Extension, the Visual Studio Code environment, and SQL Report Builder all at once. I haven't done serious development for 15 years, so I wanted to see if I could build a custom report for Dynamics 365 Business Central. After much fumbling I was able to work my way through it. At the end of these screen shots guiding the process, I'll show a few useful links from Microsoft, for those wanting to further investigate development for D365 BC.
Before one can begin, one would need to do the following:
a) Create a subscription (trial or live) for Dynamics 365 Business Central
b) Create a Sandbox environment, within which to do all development and design
c) Download and install Visual Studio Code environment. It is free.
d) Install the AL Language Extension into your VS Code
e) Download and install SQL Report Builder 2016. It is the stand-alone version and is free.
This link will describe how to do the above:
https://docs.microsoft.com/en-us/dynamics365/business-central/dev-itpro/developer/devenv-get-started
Step 1: Open VS Code window and press Ctrl+Shift+P to show all AL commands

Step 2: From the command dropdown list, choose AL: Go!

Step 3: The first option will create the project folder on your local drive

Step 4: The second option will allow you to connect to your Sandbox, so that the report code can find the data table(s) needed for the report

Step 5: Then use the Ctrl+Shift+P combination to access the AL: Download symbols command

Step 6: Notice the Output frame at the bottom of the VS Code window shows that the Symbols have been downloaded

Step 7: An app.json file was created for you, with a few of the properties filled in. The format is
"property": "value". They are separated by commas. Property Groups have curly brackets. If a property has more than one value, square brackets enclose the list of values. Many of these properties below have not been assigned, since they won't be necessary for this demo.

Step 8: The launch.json file was also created. It points to the sandbox as the data source; and the startup object, which is a Page. In this case it will be the Customer Page. As soon as it is opened, the report will launch.

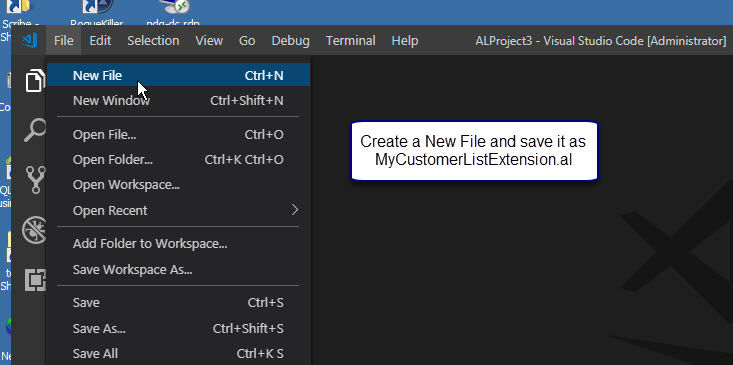
Step 9: Create a new file, which will be your code file stating from what type of extension is being written and when it will be launched. The file name is assigned with a File->Save As. The project folder will open, where you can type the new file name (MyCustomerListExtension.al). It must be an .al file type.

Step 10: I pasted in the code from the sample project instructions. This code points to a report file, which hasn't been written yet, hence the reference is underlined in the code window.

Step 11: Now create the actual report file, saving it from the File->Save As menu. In the code window you will see the the type of format, such as RDLC or Word layout; and description of the table and columns being accessed. If more than one table, you will be able to reference one to another. Not necessary here, since only the Customer table is being used. The RDLC layouts use the SQL Report Builder .rdl files from SSRS (Report Description Language).

Step 12: The report layouts (RDLC and Word) have not yet been built, but a sub-folder is needed within the parent project folder.

Step 13: The new folder appears in the VS Code Explorer pane on the left.

Step 14: Build a Package for the project. Use Ctrl+Shift+P to run the AL: Package command.

Step 15: In the layouts folder, 2 report layout files were created. Right-Click on the .rdl file and use the context menu to Open Externally. This will open SQL Report Builder.

Step 16: The SQL Report Builder interface knows the dataset that was described within the .al file.

Step 17: Insert a Table, using the Table Wizard.

Step 18: Drag 3 of the Available fields to the Values box.

Step 19: Widen the columns and bold the headings. Format the Balance to show as currency.

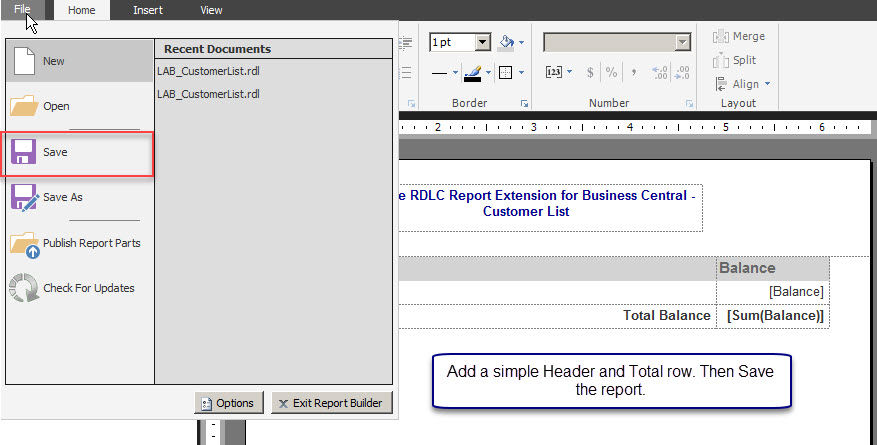
Step 20: Insert a Header, a Totals Row, and Save.

Step 21: Since the Package (the .app file) had already been created prior, I deleted it and recreated it with the AL: Package command. Then the AL: Publish command was used to publish this app to the sandbox.

Step 22: An error occurred when trying to Publish. In the Output frame at the bottom of the code window the error is explained. So I added the property, "showMyCode":"true" as the last line in the app.json file. Then republished the app successfully.

Step 23: The Business Central Sandbox opens and Voila!

Step 24: In the Sandbox, I see ALProject3 is installed in the Setup & Extensions page.

Step 25: I can get it into the live BC environment, by opening the live tenant, Setup & Extensions->Extensions->Manage->Upload Extension.

Step 26: The Upload command will point to my local drive where I can locate the .app file within the new project folder.

Step 27: Select the correct .app file, Accept and hit the Deploy button.

Step 28: It takes a few minutes to appear in the Setup & Extensions list.

Step 29: When I open the Customer List, this new report is triggered. It is convenient to have the total of open balances for customers. It will match the Accounts Receivable totals in the Chart of Accounts.

For those wishing further study here is a list of Microsoft resources. Also, I encourage getting a GitHub account, where you should be able to find many sample code snippets.
For a full listing of report functions, refer to the Microsoft Dynamics 365 Business Central Developer and IT Pro Help
Here are a few more links:
Data-item-triggers Report Data Types A lot to learn...
Thanks for following this through.
Steve Simon
PDG Consultants, Inc.


