Adding a Simple Dataset to the Customer Table and Page, within Business Central
- Steve Simon
- Jan 4, 2019
- 3 min read
Customizations and modifications to Business Central are done with Extensions. They can be installed or uninstalled at will without altering the underlying BC tables or code. This is the modern way to customize, so that the client is not locked into an old version of the ERP.
I created a Rewards table, with 3 entries and linked it to the Customer Table and Page (the table is the underlying data, while the Page is a screen usually showing just one record – unless it is a header/detail screen, where the detail might have multiple records with the header as the parent).
This project was taken, verbatim, from the Microsoft article: “Building Your First Sample Extension with Extension Objects, Install Code, and Upgrade Code."
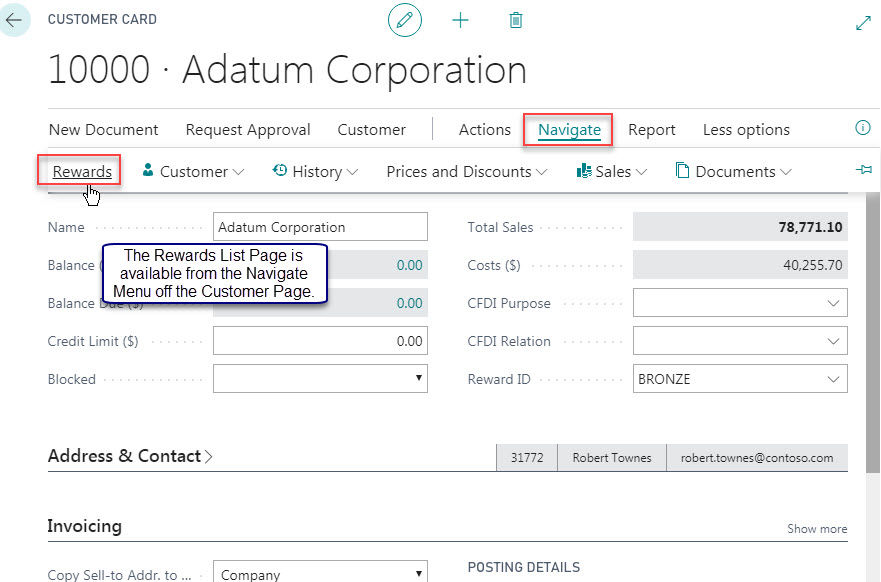
Here you see the Reward ID field, with a label, added to the Customer Page in BC.

Below you will see how to access the Rewards List, from the Navigate Menu off the Customer Page.


The Rewards Card Page allows view/edit of each record in the Reward table.

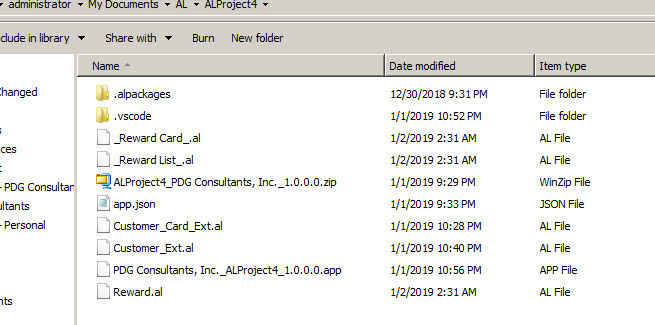
To begin the project - I created a new folder in the VS Code window. I named it ALProject4 (not too creative). A project folder is the workspace in which the .json and .al files are created. These files launch the app and describe what actions and displays must occur.

Here is what the folder would look like in the VS Code environment. The Navigation Pane is on the left, while the launch.json file shows in the Code Window.

When you start a new project, the launch.json and app.json files are automatically created. VS Code will give you the option to choose the Cloud tenant or On Premises tenant. The app.json file is pictured below.

The first .al file we needed to create was the one describing the Table object, Reward.al. Here is the code, which I just copied and pasted from the Microsoft link at the beginning of this article. It creates the “Reward” table, with 5 fields, some attributes, a primary key, and triggers – which define what happens when the user wants to Add, Edit, or Delete a record in the Reward table. The whack-whacks prefix comment code, which is much appreciated.


The next .al file to be created was the Reward Card.al, which describes the Card Page. Notice that the Page ID is 50102. It must be unique and within the range allowed in app.json. It references the SourceTable (Reward) and connects each field in the Reward table with a corresponding display field on the card (form).

Then create a file called Reward List.al, which describes the List Page for Rewards. Notice the ID is unique. The SourceTable is referenced; and so is the CardPageID. It uses a Repeater(Group) function to display all rows in the Reward table. Each column in the record is defined within this group.

In order to connect the Customer Table with the Reward table, we need to add a Reward ID control to the Customer Card. This code also adds a Navigation link to the Customer Card, in order to access the Reward List Page. This way the customer table itself is not altered. This is the Customer_Card_Ext.al file. When the Rewards Menu item is chosen the Rewards List Page appears.

The Customer_Ext.al file links the Reward Table with the Customer table. Microsoft doesn’t allow modification of the base tables in BC, but will allow an “Extension”, which is a custom table connected to the base table, using a Primary Key in the Reward table to connect with a matching field in the Customer table. In the Customer Card file above we added the "Reward ID" field (lookup) to the Customer Card. That is the link with the Reward table. Notice the "If" statement below showing an Error Message if the user tries to edit the Reward ID for a "Blocked" customer - one that is on sales hold, for instance.

You have the choice of building the Package with just the above, or adding some records to initialize the dataset. Here is a “codeunit” which runs procedures to insert default records to the Reward table. Rewards_Install_Code.al.

So it is possible for a programming “newbie” to build an extension in Business Central which adds custom data to an existing BC table and Page.
Click this get started link on AL development.
Thanks for following this post.
Sincerely,
Steve Simon PDG Consultants, Inc.


Comments